User Guide — Basics
Basic usage of the CrossPoint Reader Korean firmware.
Current docs version: v1.5.0-ko.3
What's new in v1.5.0
This release folds upstream CrossPoint v1.5.0 into the Korean firmware. Full notes are on the release notes page.
Settings & UI
- Selection popup: settings with three or more choices now open a dialog instead of cycling one value at a time
- Dictionary entry under Settings > Reader (shown only when the SD card has one)
- Customise status bar: configure the clock, progress bar, title and battery individually
- Quick Resume sleep screen: keeps the current page on screen with just a moon icon, so waking is instant
- New control options: long-press menu (bookmark / dictionary / KOSync) and short Back to file browser
RoundedRafftheme added
File management
- Register and manage several OPDS servers
- Set the OPDS download folder and filename format (Author-Title / Title-Author / Title)
- Image previews in the web file browser
- Device serial number shown in the web UI
- Move finished books to the Read folder automatically
- Drop read books from the Recents list automatically
Reading experience
- Incremental section indexing: the first page of a big book opens immediately and the rest indexes in the background. First opens drop from minutes to seconds
- Offline dictionary: drop a StarDict dictionary on the SD card and look up any word
- Bookmarks: add and remove them from the reader menu, and jump from the list
- What to read next: finishing a book suggests another one from your device
- EPUB ruby (furigana) rendering, wider CSS text-decoration support, better list bullet alignment
- Rendering and memory work fixes the out-of-memory crashes complex EPUBs could trigger
- The per-book reading timer remains a Korean-build feature (details)
System & stability
- Automatic reconnection to saved Wi-Fi networks, plus manual hidden SSID entry
- KOReader sync gained device-side account signup, document matching, metadata upload and smart sync
- Firmware built for a different device is refused
- Fixes the Korean build reporting 91% on a fully charged battery
- The SDK moved from open-x4-sdk to freeink-sdk
- Settings live in
/.crosspoint/settings.json. Upstream dropped the legacysettings.binmigration in 1.5.0, so coming straight from 1.2.0-ko resets them - Only Korean and English ship (flash budget). All 61 new strings in this release are translated
X3 only
- Tilt to flip page: the QMI8658 gyro detects a left/right tilt and turns the page (direction can be inverted)
- Status bar clock: DS3231 RTC with automatic NTP sync and a configurable UTC offset
- One firmware serves X3 and X4; each setting appears or hides based on the hardware present
The Korean firmware supports both the Xteink X3 and Xteink X4. Pick the model you have on the tabs below to see the form factor and button layout.
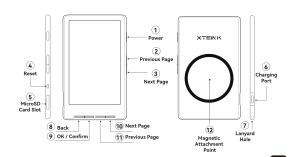
Image source: official Xteink X4 user manual
Specifications
- Display: 4.3" E-Ink (220 PPI)
- Dimensions: 112 × 69 × 6 mm (~4.4" × 2.72" × 0.23")
- Weight: 74 g
- Battery: 450 mAh
- Storage: 32 GB (MicroSD)
- RAM: 128 MB
- Charging: USB Type-C
X4-only Features
- 1% battery percentage display (Smooth Battery)
- Software correction for sunlight bleed on the white model
- Magnetic mount points on the back (for cases / stands)
The X4 has no gyro/RTC, so tilt-to-flip and the status bar clock are hidden automatically.
Button Layout
| Location | Button / Port |
|---|---|
| Bottom | Back, OK, Next page, Previous page |
| Left side | Reset, MicroSD card slot |
| Right side | Power, Previous page, Next page, USB-C charging port, strap hole |
| Back | Magnetic mount points |
Button functions can be customized in Settings.
Power on/off
To turn the device on or off, hold the power button for at least 0.5 seconds.
You can change the power button to a short click in Settings.
To reboot the device (e.g. after a firmware update or if it freezes), press and release the reset button, then hold the power button for a few seconds.
First launch
When you turn on the device for the first time, the home screen is shown.
Note: The last book is auto-opened on the next start only if you were actively reading when the device was powered off. If you were in the file explorer or settings menu, you'll go back to the home screen instead.
The main entry point of the firmware. From here you can jump to Continue Reading, File Explorer, File Transfer, and Settings.
The file explorer is split into two tabs:
Recent
Lists recently opened books so you can jump back to your last reading session quickly.
Files (file browser)
Browse the folders and files on the SD card.
Controls:
- Switch tab: Left/right buttons toggle between Recent and Files
- Browse list: Up/down (or volume up/down) buttons. Hold to scroll page-by-page
- Open selection: OK opens the folder or starts reading the book
- Delete file: Long-press OK and release to bring up the delete confirmation dialog. (Folder deletion is not supported)
- Multi-select delete: Select multiple files at once and delete them together. (v1.2.0+)
- Full path display: The current folder's full path is shown at the top so you always know where you are, even deep in the tree.
- File extension display: File names are shown with their extension, and folders are highlighted with a
[dir]prefix. - Hidden files/folders: Once enabled in settings, items beginning with
.are also listed. - BMP image viewer: Selecting a
.bmpfile in the browser opens it in the image viewer.
See the Reading Mode section below for details.
When you open a book the button mapping changes for reading.
Turning pages
| Action | Button |
|---|---|
| Previous page | Left or Previous |
| Next page | Right or Next |
The role of the side (volume) buttons can be changed in Settings.
Tip: Set Settings > Power button short press to Page turn to also use the power button to flip pages.
Chapter navigation
- Next chapter: Long press then release Right (or Next)
- Previous chapter: Long press then release Left (or Previous)
System navigation
- Back to file explorer: Press Back to close the book and return to the file explorer
- Back to home: Long-press Back to close the book and return to the home screen
- Chapter menu: Press OK to open the table of contents / chapter selection screen
Supported languages
CrossPoint renders text using the following Unicode character blocks:
- Latin (basic, supplement, extended-A): English, German, French, Spanish, Portuguese, Italian, Dutch, Swedish, Norwegian, Danish, Finnish, Polish, Czech, Hungarian, Romanian, Slovak, Slovenian, Lithuanian, Turkish, Catalan, and more
- Cyrillic (standard and extended): Russian, Ukrainian, Belarusian, Bulgarian, Serbian, Macedonian, Kazakh, Kyrgyz, Mongolian, and more
- Korean: Fully supported in the Korean firmware (custom font included)
The Korean firmware ships only two UI languages, Korean and English, because of the flash budget: KoPub Batang and Pretendard already take up most of the image, leaving no room for the rest of the translations. This is unrelated to the language of your books — any EPUB renders fine as long as the font covers its script.
Not supported: Chinese, Japanese, Vietnamese, Hebrew, Arabic, Greek, Persian
EPUB image support
JPG and PNG images embedded in EPUB files are rendered. Images are auto-fitted to the screen, and you can disable image rendering via Settings → Display → Images.
v1.2.0 swaps the cover image decoder to JPEGDEC for major performance gains. Per-pixel image rendering overhead has been removed, so page turns are faster in image-heavy books, and the upload size limit for large EPUBs has been relaxed.
Note: Large images such as covers may still take a moment to convert. GIF, SVG, and WebP formats are not yet supported. Heavy-cover EPUBs are faster if you pre-optimize them with EPUB to XTC Converter.
Press the OK button while reading to access this screen.
- Use Up/Down (or volume up/down) to choose the chapter
- Press OK to jump to that chapter
- or press Back to cancel and return to the current page
KOReader Sync
When KOReader Sync is enabled in settings, the chapter selection screen shows additional options:
- Sync Progress: Jump to the synced reading position from the KOReader server
- The synced chapter name is also displayed so you can easily see where you left off on another device